Install Docker
Follow the instructions here to install Docker on Ubuntu.
Fundamentals
Docker is composed of two parts: the Docker daemon and the Docker CLI (command line interface). The daemon is the core of Docker and it exposes a REST API. The CLI is a tool to communicate with the daemon and that is what we use for the examples in this post.
The REST API can be consumed from other applications. For more information on developing applications with Docker, refer to the developer site.
Running Docker containers simplifies software installation and management for several reasons.
- An application is packaged with all the dependencies it needs to run, preventing issues with library installation and compatibility.
- Uninstalling an application is a simple as stopping the container. No residual clutter is left on the machine.
- The application can only access the resources within the container (for example, the container has its own filesystem that is separate from the host’s).
- Virtual machines could achieve similar benefits, but containers have less overhead (the OS is shared).
The docker commands shown in the rest of the post require superuser access. Using sudo before the command is implied.
Images
Containers are created from images. An image includes all the files needed to run an application inside a container.
Internally, an image is organized in layers, which capture incremental changes to the filesystem. For example, you can copy an existing image and make a change. When you record (commit) the change, a new layer is created. The original and new image share all layers except the last one. Layers allow more efficient management of the images and reduce duplication.
Images are stored in registries. The default is Docker Hub. You can create customized registries, but that’s beyond the scope of this intro. Images in a registry are typically tagged by version.
The examples in this post will use an NGINX image (web server). The image we’ll use is nginx:latest, which indicates the latest version.
Pull the image from Docker Hub
docker pull nginx:latest
After the image is downloaded, you can see on the list of available images
docker images
To delete the image
docker rmi nginx
Containers
To start a container from an image, use the run command
docker run nginx:latest
If the image is not available locally, it will be pulled first (so, it is technically not necessary to pull separately as we did before). This is the most basic run command, but there are a few issues we need to address.
First, the program runs in the foreground and blocks the shell (press Ctrl+C to stop the program and, therefore, the container). To start it in the background, we need to add the -d or –detach flag.
Second, we did not assign a name to the container. A name is assigned by default, but it is better to specify one ourselves that is easier to remember. We do that using the –name flag.
Let’s try again.
docker run -d --name websrv nginx:latest
The program now starts in the background. The ps command shows the running containers
docker ps
To see the full list of containers in any state (running or not), add the -a flag
docker ps -a
The last command shows that we actually created two containers. Every time we use the run command, a new container is created. Let’s remove the first container we created. Get the name from the ps -a command output and then use
docker rm container_name
It is possible to remove a container only if it’s not running.
We now still have the websrv container still running. To stop it, use
docker stop websrv
To start it again, use the start command
docker start websrv
As an additional note, the run command creates and starts a container. It is also possible to create a container without starting it using the create command. The syntax is similar to run. The container will have to be started manually using the start command.
There is still one thing missing from the run command we used. The web server in the container listens on port 80. However, the port inside the container is not reachable from the host unless it’s mapped to a host port. To map a port, we use the -p flag (-p host_port:container_port). Stop and delete the websrv container and recreate it with the following command
docker run -p 80:80 -d --name websrv nginx:latest
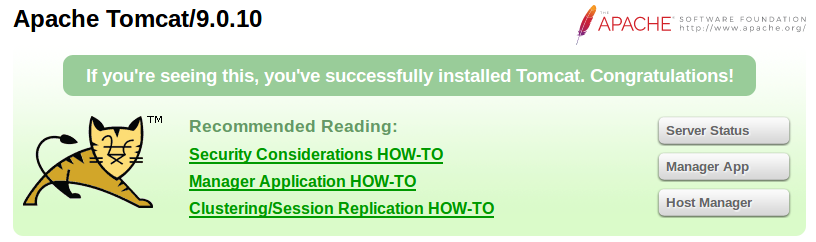
If we visit http:\\localhost from a browser on the host, we’ll now see NGINX’s welcome page.
There’s, of course, a lot more to learn about Docker and this is just the tip of the iceberg!
Recommended Reading
Docker in Action (ISBN: 1633430235)
Excellent coverage of Docker basics, storage, networking, registries, and Docker Compose.
2 Pingbacks