
Objective
We will create a simple weather application in Angular. The user selects a city and the current weather conditions and temperature are pulled from OpenWeatherMap.
We will cover the following Angular topics
- Components
- Services
- Interpolation, property, event, and two-way binding
- Template-driven forms
- Output events
- Template variables
The purpose of the application is to showcase Angular’s main capabilities. So, we will keep the interface as simple as possible. We can make it pretty later.
Tools
Visual Studio Code or your favorite editor
- Go to the Price section. Under Free, select Get API key and Start.
- Sign up for an account.
- Get the API key (APPID) from your account.
- Refer to the How to Start page for examples of how to pull data. Note that it may take 10 minutes for your key to be active.
- Example: api.openweathermap.org/data/2.5/weather?q=London&APPID=your_app_id. Replace your_app_id with your key. The data is returned in JSON format.
Source Code
It is recommended that you code the project step by step. If you need the source code, follow these steps.
- Clone the repository in a folder
git clone https://github.com/lucagiac81/angular-simple-weather-app.git
- The repository doesn’t include the dependencies. This is the typical approach for Angular projects, and the .gitignore file generated by Angular follows it. To install the dependencies, run the following from the project folder.
npm install
- Add your OpenWeatherMap API key in src/app/services/weather-data.service.ts
- Test the project. A browser window will open.
ng serve --open
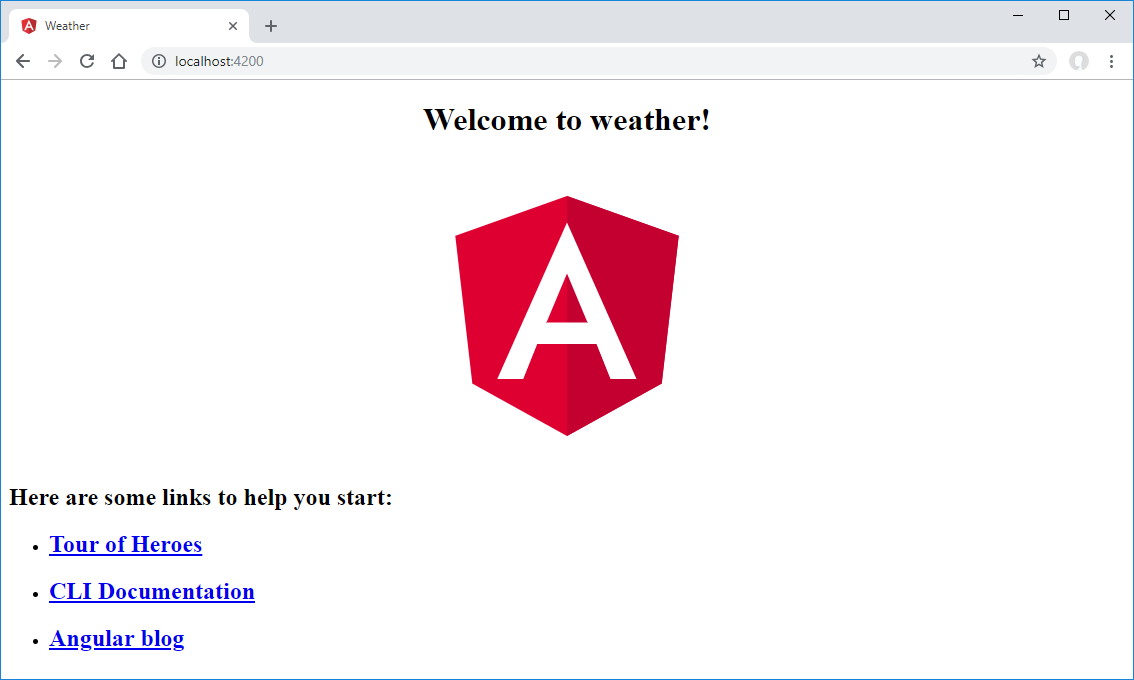
Create a New App
From the command line, use the following.
ng new weather
cd weather
ng serve --open
This generates a default app with the needed scaffolding in place. A welcome page at localhost:4200 will open automatically (thanks to the –open flag).
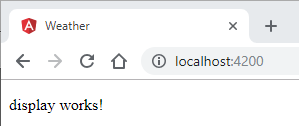
Create the Display Component
We start with a component to display the weather data. To generate a new component, use the following command.
ng generate component components/display
The following files are generated inside src/app/components/display
-
-
- display.component.html: component’s template. The default content is just a paragraph with some text (“display works!”).
- display.component.css: style sheet for the template. Empty by default.
- display.component.ts: TypeScript file with the component’s controller. The basic code is generated by Angular (decorator with properties, empty controller).
- display.component.spec.ts: test stub. This is outside the scope of this post.
-
Open the src/app/app.module.ts file. DisplayComponent was automatically added to the imports and to NgModule.
import { BrowserModule } from '@angular/platform-browser'
import { NgModule } from '@angular/core'

import { AppComponent } from './app.component'
import { DisplayComponent } from './components/display/display.component'

@NgModule({
  declarations: [
    AppComponent,
    DisplayComponent
  ],
  imports: [
    BrowserModule
  ],
  providers: [],
  bootstrap: [AppComponent]
})
export class AppModule { }
Update src/app/app.component.html (template for the App component) . Erase the default content generated by Angular when creating the app and replace it with the following.
<app-display></app-display>
app-display is the selector for the Display component. The selector is specified in display.component.ts (one of the properties of the @Component decorator). Launch the app with ng serve if not already running and visit localhost:4200 in a browser (if the app is already running, it will update any time a file is modified). The “display works!” text from the Display component will be shown.
The component works! Now we just need to customize it.
Declare a Class for Weather Data
To pass data between components, let’s define a class to hold the weather information. Place the definition in the App component.
import { Component } from '@angular/core'

export class Weather {
  city: String
  conditions: String
  temperature: number
  icon: String
}

@Component({
  selector: 'app-root',
  templateUrl: './app.component.html',
  styleUrls: ['./app.component.css']
})
export class AppComponent {
  title = 'weather';
}
Customize the Display Component
Open display.component.html (Display component template) and replace the content with the following.
<h2>{{weather.city}}</h2>
<img [src]="weather.icon" style="float: left;"/>
<p>
  Conditions: {{weather.conditions}}<br/>
  Temperature: {{weather.temperature}} °F<br/>
</p>
The braces {{ }} contain expressions that refer to an object property in the controller. This is an example of interpolation binding.
The square brackets [ ] around src are an example of property binding. The expression in quotes is evaluated and the result is assigned to the src property.
Let’s add that object property in display.component.ts that the bindings refer to.
import { Component } from '@angular/core'
import { Weather } from '../../app.component'

@Component({
  selector: 'app-display',
  templateUrl: './display.component.html',
  styleUrls: ['./display.component.css']
})
export class DisplayComponent {
  weather: Weather = {
    city: "Los Angeles",
    conditions: "Sunny",
    temperature: 70,
    icon: ""
  }
}
A property of type Weather is defined. No visibility modifiers are needed, because the default visibility in TypeScript is public. The object is populated with default values, so we can see the results immediately. This implementation is temporary and we’ll modify it later.
Note that the OnInit import, the ngOnInit() method, and the constructor were removed, as we don’t need them.
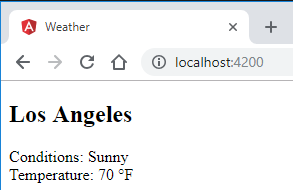
The application looks as below.
Create the Data Service
We’ll now create a service to pull weather data from OpenWeatherMap.
ng generate service services/weatherdata
Only a .ts and a .spec.ts files are generated (no HTML template or CSS file, as the service doesn’t have a view). We are going to edit the .ts file.
import { Injectable } from '@angular/core'
import { HttpClient } from '@angular/common/http'

let serviceUrl: String = 'https://api.openweathermap.org/data/2.5/weather'
let apiKey: String = ''  // insert your API key here

@Injectable({
  providedIn: 'root'
})
export class WeatherDataService {

  constructor(private http: HttpClient) { }

  load(city: String) {
    return this.http.get(serviceUrl + '?q=' + city + '&APPID=' + apiKey)
  }

  getIconUrl(icon: String) {
    return 'http://openweathermap.org/img/w/' + icon + ".png"
  }
}
The load() method calls the API for a city and retrieves the weather data. The return value of http.get is an Observable. We will use this fact in the next component. For more information about HttpClient, refer to Angular’s documentation.
The getIconUrl() method is a utility method. The data includes the name of a weather icon. This method builds the full path to the icon given its name.
The CLI doesn’t register the service with the app module automatically. Open src/app/app.module.ts and add the following imports.
import { HttpClientModule } from '@angular/common/http'
import { WeatherDataService } from './services/weather-data.service'
Also modify the imports and providers in NgModule.
imports: [
  BrowserModule,
  HttpClientModule
],
providers: [WeatherDataService],
Create the Selection Component
We now need a component to select the city.
ng generate component components/selection
Edit the HTML template. This is a simple form with one text input to specify the city and a submit button. We are using what is called a template-driven form in Angular.
<form (ngSubmit)="submit()">
  City:<br>
  <input type="text" name="city" [(ngModel)]="city"><br>
  <input type="submit" value="Submit">
</form>
The [( )] syntax is for two-way binding. With this binding, data flows both ways: from controller to template (like with interpolation), but also from template to controller through an implicit event binding.
For the form to work, add the Forms module to app.module.ts.
import { FormsModule } from '@angular/forms'
imports: [
  BrowserModule,
  HttpClientModule,
  FormsModule
],
Add the component to src/app/app.component.html.
<app-display></app-display>
<app-selection></app-selection>
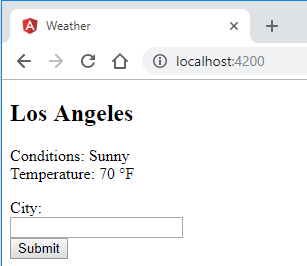
The app will look like this.
We need to add the code to pull data from the service when the form is submitted.
import { Component, Output, EventEmitter } from '@angular/core';
import { WeatherDataService } from '../../services/weather-data.service'
import { Weather } from '../../app.component';

@Component({
  selector: 'app-selection',
  templateUrl: './selection.component.html',
  styleUrls: ['./selection.component.css']
})
export class SelectionComponent {
  @Output() onSelection: EventEmitter<Weather> = new EventEmitter<Weather>()
  weather: Weather = new Weather()
  city: String = ""

  constructor(private weatherData: WeatherDataService) { }

  submit() {
    this.weatherData.load(this.city).subscribe(data => {
      this.weather.city = data['name']
      this.weather.conditions = data['weather'][0]['main']
      this.weather.temperature = Math.round((data['main']['temp'] - 273.15)*1.8 + 32)
      this.weather.icon = this.weatherData.getIconUrl(data['weather'][0]['icon'])

      this.onSelection.emit(this.weather)
    })
  }
}
Some parts require explanation
- Output and EventEmitter: when the data is retrieved, we want to generate an event that the parent component (App component) can handle to pass data to the Display component. This is called an output event.
- WeatherService: the service is imported and injected through the constructor. The load() method of the service returns an Observable (as mentioned in the previous section). To retrieve the data, we use the subscribe() method, which is called once the data is available. The method takes a function having the data as argument. Relevant information is extracted from the JSON output.
Transfer Data to the Display Component
Once the data is pulled in the Selection component, an event is generated to propagate the data up to the App component. To have the App component handle the event, edit app.component.html.
<app-display #display></app-display>
<app-selection (onSelection)="display.update($event)"></app-selection>
(onSelection) is an example of event binding. The App component receives the data and it passes it down to the Display component. #display is a template variable that creates a reference to the Display component’s controller. Add the following code to the Display component.
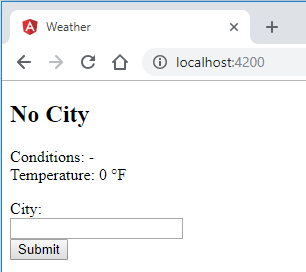
export class DisplayComponent {
  weather: Weather = {
    city: "No City",
    conditions: "-",
    temperature: 0,
    icon: ""
  }

  update(weather: Weather) {
    this.weather = weather
  }
}
The update method is called in response to an event from the Selection component. Note that we removed the default data from the weather object as well.
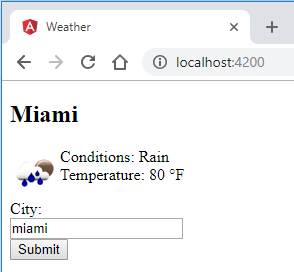
This completes our application. We can now test it.
Recommended Reading
Angular in Action (ISBN: 9781617293313)
Clear and complete coverage of Angular, with useful examples along the way.
Leave a Reply